9 Instagram Features You Didn’t know Exist That You Should be Using
Almost everything you use has “hidden” features. Most of the time, it’s not that it’s hidden by purpose, but the features have to be placed somewhere, and as a result, people might never get aware of their existence because they’re not actively searching for them.
When you know the ins and outs of a social media platform, you can do so much more, and reach your full potential on that platform. Most importantly, you can surprise your audience and show them that you’re an industry-leading expert.
If you aren’t fully educated on the social platforms you are doing, you are undoubtedly missing out on great opportunities. What if you’re going to run a race but have no idea that you can tie your shoes? When you know the features you have at your disposal on the social media platforms you’re using, your job will both get easier and your results will be better.
Instagram, in particular, has evolved a lot over the years. Every week, or at least every month, an update of the app has been available. Now, the update does of course not include a major update, but in the last couple of years, we have had several of those, and unless you’re actively looking at the Instagram news, there’s a big risk you aren’t aware of them.
In this article, we’ll present you with the top features on Instagram that you might not be aware of, to help you stay on top of what Instagram can really do, and to teach you how to use them.
Archive old posts
Did you know that you can archive your old posts on Instagram? A lot of people don’t because it’s a relatively hidden featured that isn’t spoken about a lot.
The Archive feature, lets you keep your profile feed looking top-notch at all times by giving you the ability to move and hide the posts from your profile into the private tab. The best part is that if you change your mind, you can just reshare the archived post and it will appear in its original chronological spot. And the posts you hide in the Archive tab can only be seen by you.
This new feature allows you to clean up your feed without having to delete the posts permanently, while also giving you the ability to reshare the post so that it ends up in its original spot rather than as a new post.
Instagram describes this feature like this:
“Your profile is a representation of who you are and evolves with you over time. With Archive, you now have more flexibility to shape your profile while still preserving moments that matter.”
How to archive a post
Archiving a post is super easy.Tap the three dots
1.Tap the three dots at the top-right corner of the post you wish to archive. Note that you can only archive your own posts. If you’d like to save other people’s posts in a tab on Instagram, you can do so, but it is with the use of another feature that you probably aren’t aware exists on Instagram.
2. Select “Archive” at the top of the list that appears.
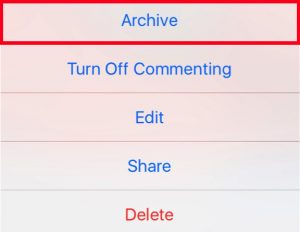
3. The post will now move from your personal feed into your Archive tab.
4. To access your Archive tab and see archived posts, go to your profile and tap the symbol looking like a circular arrow and a watch, located at the absolute top-right corner of your screen.
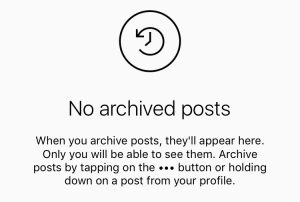
5. If you want to reshare the post you’ve archived, tap “Show on profile”
Location explore tab
If you use Instagram regularly, you should be familiar with the explore tab by now.
If not, let me explain it quickly.
You might say that there are two explore pages. One official and several sub-explore pages.
The official explore page is the one that has an own section in the form of an icon at the bottom of your screen when you are on Instagram. This explore page is supposed to present you posts that Instagram believe is relevant to you based on your previous interaction and a variety of different criteria.
Okay, so the explore page is not something new. Almost every Instagram user knows about it because it’s clearly presented.
The explore page’s official name is search and explore, and it is the first name that we’ll look more into detail.
The search tab allows you to search for posts by hashtag and locations. Now, we’re going to focus on the location tab, but you can have in mind that the hashtag page works in the exact same way.
Both of these are highly underestimated parts of Instagram for more exposure and reach with your posts. The location tag presents posts that have been shared from a particular location that you search for. Let’s say you search for New York, then the posts that will be presented have been checked-in to that location.
You will be presented with a list of posts, and at the top of the list, you’ll see almost like a private section of 9 posts. These are the so-called featured posts, which means that it is the posts that have been shared most recently that has gotten the highest engagement/reach.
This feature is not only good for inspiration and to see what is happening in your area and industry, but also to give you a boost in exposure if you get your post there.
Since this feature is so effective, firstly because it will give you a ton of exposure, you should add a location to every single one of your posts, as well as hashtags.
Here’s a guide on how you get to top posts.
Activate comment filters
Did you know that you can set up a comment filter that blocks particular comments on your post? In Instagram’s attempt to decrease the hatred on the platform, they took several actions, one of them being the comment filter.
Whether you are a private person receiving hate on a regular basis, or if you’re a brand that receives hate comments for no reason, comment filters can help you prevent them from being posted.
How to activate comment filter
- Go to your profile and tap the cogwheel
- Scroll down until you see “Comments”. Tap it
- You’ll now be presented with the following screen:
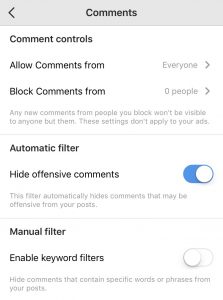
- Here, you have the ability to select people that you only want to receive comments from, as well as select people you want to block from commenting on your posts.
- Second, you have the automatic filter that automatically hides comments that may be offensive from your post.
- For the manual filter, you add keywords separated by commas. This way, all comments that contain one or more of your selected words will be blocked from your post.
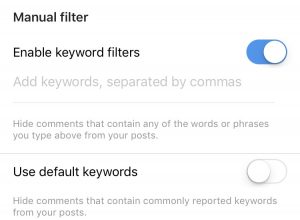
Last but not least, by choosing the default keywords, you can hide comments that contain commonly reported keywords from your posts.
Turn off comments
If you wish to turn off your comments completely for a post you can do so. However, there is no setting that allows you to turn off comments completely for all your posts automatically.
To turn off comments, you need to manually do it when you share your post (or after).
When you turn off comments, the comment icon in the form of a speech bubble that is located at the bottom left corner of a post will disappear, only leaving two icons left – the luke button and the Direct message icon. This way, you can see if someone has turned off their comments.
How to turn off comments
If you are just about to share a post, and you are at the section where you write your caption, tap on the button that is located at the bottom of your screen that says “Advanced Settings”

If the post is already shared, tap on the three dots at the top right corner of the post and you’ll see “Turn of commenting” as the second option.
Use locations and hashtags on Stories to get more reach
Did you know you can use hashtags and locations on your Instagram Story? Did you also know that Stories has an own tab at the top of respective hashtag and location – just like the top posts we just talked about?
By adding hashtags or locations to your Instagram Story, you have a chance at getting featured on the “official” story of that hashtag respective location, which is basically a fruit salad of people that have shared a story using that respective location or hashtag. Just because you add them to your story doesn’t mean that your story will end up there.
The best part about “top stories” is that it’s not as dependent on your account’s size – even though your chances are dramatically increased if you have a large account.
Repost Live videos in Stories
When Instagram released the live feature, everyone was exalted, because Live Video is the feature of today. Every major social platform is introducing it, and it is widely popular.
The only problem for Instagram was that when you were done with your Live video and turned off the broadcast, the Live Video disappeared forever. In other words, there was no ability for you to save it – even though a lot of fun things had happened during your live video.
Instagram soon fixed this so you could save your story once you’ve ended the broadcast, but what’s more, they also made it possible to reshare your live video but as a story.
How to reshare your live video
- Go to live video by swiping to the left from your home page and then selecting Live Video. Tap start broadcasting to start a live video.
- When you end your live video, click share at the bottom of the screen.
- Now, your live video will be available for people to see for 24 hours before it disappears.
Save posts in collections
For a very long time, people had been complaining about the fact that there is no “official” way or feature to download an image or video from the platform. And this is exactly what this feature was a response to.
With this feature, you can save others’ or your own posts to your “private collection” without anyone knowing.
When you’ve saved posts, you can arrange these into albums to be better organized.
Some call this a private version of Pinterest because, in reality, that’s exactly what it is.
This feature can be used for a ton of different things, and it is extremely helpful. For example, if you wish to see what your competitor is doing, you can create an album solely dedicated to their posts, or if you want to save all User-generated content that your customers have shared, you can create an album solely dedicated for that, easily storing everything in one place.
How to save a post to your collections
- Go to the post you wish to save.
- Tap the bookmark icon located at the bottom-right corner of the post.
- If you have created several albums, select which you wish to save the post in.
- If you want to see the post you’ve saved, go to your profile and tap the bookmark icon located to the right just below your profile bio.
How to create a collection
If you wish to create a new collection, in other words, a new album, you can do so. You can create as many albums as you like, to better separate the different content you are saving. To keep track of them, you can also name the album you are creating.
THere are two ways to create a new album.
- Go to your profile and tap the bookmark icon.
- Tap on the plus-sign in the top right corner.
- Name your new collection and tap next.
- Go your profile page and tap the bookmark icon
- Click the plus-sign icon in the right corner
- Now, you will have the option to add images that you’ve saved in your collection to that partiuclar album.
- Choose images to add or tap Done at the top right corner if you don’t wish to add any.
How to create a new Album
If you wish to do so, you can create an album using another method.
- Go to the post you want to save.
- Tap and hold on the bookmark icon
- Now, you’ll be presented with the option to create a new collection and name it.
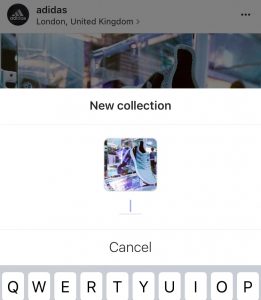
This will add the saved image to your new collection.
Add a link to your Story
Instagram lets you add links to your Story if you have over 10K followers or a verified account. Since Instagram is greatly limiting the number of clickable links on the platform to prevent spam, the link in stories is extremely helpful because only your imagination sets the limits.
Whatever it is you are promoting, you can drive people from your Instagram to your website, thus making the user experience for your followers a lot better. The links aren’t clickable like they usually are, instead, you swipe up on the screen to get redirected to the website.
If you’re watching a Story that has a link, you’ll see “See more” at the bottom of the screen and an arrow pointing up, symbolizing that there’s a link in the Story. To access the link, tap on the arrow or simply swipe up.
How to add a link to your story
Create a story by snapping a photo, video, or selecting an image from your camera roll
3. Click on the link icon in the top right corner of the screen
Add the URL you wish to use. If you’d like, you can also preview the link.
Finish editing and share story. To get the most out of your link, you always want to add a call to action to encourage people to go to your link.
Rearrange and discover filters
Did you know that there are 40 filters on Instagram? Probably not, because from your presets, not all of them are displayed at the same time.
With the filter manager on Instagram, you can rearrange and choose the filters you want in a heartbeat.
Create a post like you usually do, and make sure the “Filter” section is open.

Swipe left on the filters until you see a square that says manage. This will be the last box in the lineup of filters. Tap it.
Here, you’ll be presented with a complete list of all the filters that are available. Click in the checkbox next to a filter to be able to choose from it when sharing a post or tap and slide on a filter to rearrange its order and how it is displayed.
Were you unfamiliar with all of the listed Instagram features? If not, which were new and which did you know?
Let us know in the comments below!


